Monday, March 31, 2014

DIY Simple Easter egg door hanger


As part of my seasonal decor, I usually have a small something that I hang on our coat closet door.  I like having that little bit of fun as I walk down the hall to the kitchen , or I can see whenever I have to get a jacket or scarf or whatever. 

April is my Easter month, so I made this cute little Easter egg hanger to put on the door. Using my Cameo, I cut an egg template for the hubby and he cut an egg out of some of our wood stash. 


This pic is me testing his cut against the template from the Cameo, he done real good!  (Yes, I'm aware that's not proper English, but it fits so oh well). 

Next I spray painted the egg white, I used 2 coats to make sure it was completely covered. 


Awhile back, I found this wonderful chevron painter's tape by Frogtape. This stuff is awesome! Expensive, but worth it. I got mine at Walmart for about $12. I've used it for 3 projects before this one, and still have half the roll left. So, still more expensive than regular painters tape, but saves a lot of time. 


I taped out my pattern on the egg, then used some acrylic craft paint to paint the chevron pattern. 


I wanted the hanger to be simple, so I used grey craft paint-well, actually I used grey and white. The grey I had was darker than what I wanted, so I lightened it up with some white. I used several coats letting each one dry completely. Next, I cut a design with my Cameo in black adhesive vinyl and put it on the egg using transfer tape. 


This pic is close up, so you can see its not perfect. There are a few places on the left side of the egg where the grey paint bled through and the grey acrylic paint is too thick along where the edges of the tape were. I blame this on my rugs to get this done and not taking my time to paint it carefully. I should've used lighter coats of the grey, or used a grey spray paint. But, I love it's "perfect imperfections", so I'm happy. 

Next the hubby drilled two holes in the top-and, yes, as I told him I should've asked him to drill the holes BEFORE I painted it, but oh well. I used two brads and a length of chain from a planter hanger kit to hang it. 


The brads fit and cover the holes perfectly, so my drill-after-painting poor decision turned out ok. I love how it turned out. Exactly what I was going for. Simple, classy, and FREE!  I had everything I needed to make this. I still may add a bow, but for now I'm enjoying the simple look. 


Friday, March 21, 2014

DIY gel air freshener


I use essential oils and fragrance oils around the house for a lot of different things. One of my favorites is country clothesline, which I use for my dryer balls. With 3 dogs, a teenage athlete and lots of cooking comes a smelly house!  I hate it when my house stinks!  Air fresheners are NOT cheap, so I thought I'd try a DIY option with some of the fragrance oils. So, using some gelatin, water, country clothesline fragrance oil and food coloring, I came up with these. 


I recycled containers, for the most part you should use glass because when you pour the mixture into the container it will be hot. I wanted to try this plastic container that was already designed for air freshened with a lid that has holes in it. So far, so good as you can see, no melting. Yet. The color came out a VERY deep purple, which is fine for me, but if you want a lighter color use minimal food coloring. I overdid it just a bit. 

Here is what I used:


The Country Clothesline oil is what I use for my dryer balls, so I had it on hand already. The food coloring I also had. I bought the large box of Knox gelatin at Walmart for $10, and used only 4 packets. 


Bring to boil 1 cup of water.  While waiting for the water to boil, pour about 30 drops of essential oil and a few drops of your choice of food coloring (if you want) into your container. When the water is boiling, whisk in 4 packets of gelatin until dissolved. Then add 1 cup of cold water and whisk. Next, pour into your containers carefully.  I actually poured from the pot into my measuring cup, then into my containers, just because the measuring cup has a wider mouth than my containers and it has the pour spout. Stir with a skewer or chopstick or Popsicle stick...something disposable. And, that's it. Let them cool and firm up, then place them in a closet or small room. These work best in smaller spaces. 


I put this one in our coat closet, and it works great!

Thursday, March 20, 2014

DIY dishwasher detergent tabs


I tried these a couple of month ago and love them!  Dishwasher detergent tablets are way too expensive in the store.  After browsing Pinterest, I saw a few posts about the DIY version.  I tweaked a few ingredients, and here is what I came up with-

1 c Borax
1 c Arm & Hammer Washing Soda
1/2 c Lemi Shine Original 
3/4 c lemon juice

Mix the dry ingredients first, then add lemon juice-carefully. It will look like this


Do not be alarmed, it will thicken up and be less foamy. Keep stirring slowly to make sure all of your dry ingredients are saturated with the lemon juice. It should have the texture/consistency of sandy dough, not too wet, not too dry. It should form easily into a ball, like you used to do when you played with Pla-Dough. 

Then, spread a sheet of wax paper on your work space, and moving kinda quickly start forming balls and mashing into squares or rectangles. Keep in mind the size of the soap dispenser in your washing machine, you'll want these to fit. **As a side note, I saw several people use ice cube trays as molds for these, you can choose to use them, or a candy mold or whatever.  I chose to free-hand 1-because it was free, and 2- because I'm impatient and I didn't have anything to use as a mold on hand. 


If you choose the free-hand method, you'll likely end up with something like this. This recipe made 40 tabs, mind you they're not very consistent in size-my hubby helped and his idea of small and my idea of small are slightly different, but oh well. If you find you've made your tabs too big for your soap dispenser, don't try to break them, they're tough little jokers. Just toss them in the bottom of the dishwasher, they'll still work just fine. 

Allow them to dry completely, usually 3-4 hours, but if possible leave them overnight. Store them in an airtight container, and treat yourself with the money you saved going DIY instead of buying pre-made. 


Yup, I re-used the Cascade canister. 


I've made 2 batches of 40 each of these now, and I still have enough ingredients to make at least 4 more batches. With the exception of the Lemi Shine, I'll have to buy more of that before I do the other ingredients. 

These work super well, dishes are nice and clean. The dishwasher even looks and smells cleaner. The box of Cascade that you see cost me approximately $23, so that's about .27 each. My DIY version cost me .06 each. May not seem like a big difference when you look at the per piece price, but when you think of it like this, 85 for $23 or 85 for $5.10. Almost $20 in savings. Well worth it for me. 

Tuesday, March 18, 2014

DIY Easter egg wreath


My Easter wreath...


Easter is coming soon, despite what the weather outside is like. I mean really, an ice storm in the middle of March?  In the south!!  

So, to try to get my mind on warmer thoughts, I decided to start my Easter decor. I wanted an Easter egg wreath, one that was cute, easy an above all CHEAP!  Since I was covering the whole thing in the plastic Easter eggs, I didn't see the point in buying a wreath form. I decided to cut a wreath form out of some cardboard.  So, back to the hoarded stash of old boxes in the garage I go!  I used the lid from our ash pail for the outer diameter, and a mixing bowl for the inner diameter, traced them and cut them out with a (very dull) box cutter.  Looking back, the width of the cardboard should've been just a bit, maybe 1/2 inch larger, meaning I should've used a smaller bowl to trace my inner diameter. It really needs to be about 2" wide to fit 2 rows of the eggs on the first layer, but I made do. Here's the wreath form along with my other supplies:


Next, I dumped all the eggs into my mixing bowl while the glue gun heated up. Then I just started gluing the eggs onto my wreath form:


I alternated the direction of the eggs to get a more uniform circle shape. There are small gaps where you can see the cardboard between the eggs, I'll cover those with Easter grass a little later. Here's a pic of the first row completed and where I started gluing the grass in the gaps:


I glued the eggs closely together so getting grass into the gaps required a thin tool, hence the old fork you see in the bottom left of the pic. Had I planned ahead, I would have first glued a layer of the grass around the wreath form BEFORE I started gluing on the eggs, so learn from my mistakes. ;-). Still, it wasn't difficult, so no worries. 

A close up of the grass in the gaps, just a dollup of glue, then smush the gras together making it as small as you can, only a few strands works, and the stuff it in the gap.  I used the fork to push it down into the glue really good. 


Then, I just kept gluing eggs on in a semi-pattern until it looked full enough. 


Then, I filled in the gaps again with some more grass.


The strands of the grass were extra long, so I did a little trimming, cutting it down to where it just barely stuck out, I didn't want it hanging out and down from the wreath. 

I'm not much of a bow maker, luckily I found this one pre-made at Michaels. 


It clashes with my red front door, but oh well. I still love it!


Monday, March 17, 2014

Homemade facial toner

More of my "make your own"!!  After making and using my make up remover (see separate post), I decided to try a facial toner as well. I mean, why not, right?  

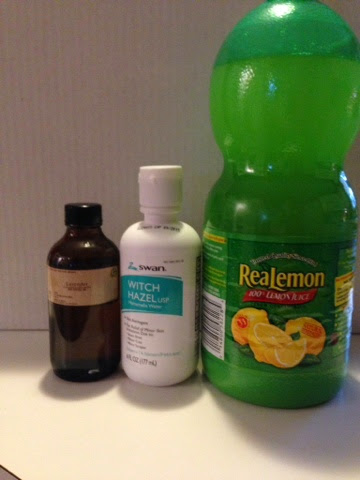
For the toner, I used witch hazel, lemon juice, and lavender essential oil. 


I had all but the witch hazel on hand, so that made this a no-brainer. 

Mix 2 parts witch hazel with 1 part lemon juice and enough essential oil to give the fragrance you want. 


For me, the cost was almost nothing. I bought a 6oz bottle to witch hazel at the dollar stor and used about 2oz of it. 


So my nighttime routine has become remove make up using my homemade make up remover, tone and tighten with my homemade toner and moisturize with plain virgin coconut oil. My skin hasn't looked or felt this good in years. At 44 years old, that's quite an accomplishment. 

Have you made any of your own beauty products?  I'd love to hear about them!

I'm thinking maybe make my own body wash next...

Homemade make up remover

I've been on a "make my own" kick for awhile now. Pinterest is my best friend when it comes to finding ideas, recipes, etc. after seeing several pins about make your own makeup remover, I decided to give it a try. My oh my how simple-and CHEAP!!!

Ingredients:

Oil- I used fractionated coconut oil (you can use olive, oil, baby oil, or really whatever you have on hand that isn't too heavy)
Baby shampoo
Water
Small bottle to put it in


Seriously, that's it!

I mixed up 1/3 cup water, 1/4 cup coconut oil, and a tablespoon of baby shampoo, poured it in a bottle, and there you have it. 


I've been using it, along with my homemade toner (see separate post) for a couple of weeks now, and I love it.  It really removes my makeup, including my waterproof eyeliner and mascara, wonderfully. I'll never go back to store bought, well never is such a strong word, but as long as I have access to the ingredients I see no reason to buy the stuff ever again. 

Cost breakdown:

Fractionated coconut oil-$12 for a 16oz bottle, used 2oz-$2.60
Baby shampoo-$1 for a 10oz bottle, used .5oz-$.05
Water-$0
Small bottle-$.50 (bought a 2-pack at the dollar store)

Total-$3.15

While you might be able to find some in the store for this price with coupons etc, keep in mind, I won't have to buy any of these ingredients for quite a while now, so my next several batches will be completely free!

Wednesday, March 5, 2014

St. Patty's Day

So, here it is 12:30am, and I'm in my craft room listening to iTunes Radio, 80's station when Madonna's True Blue comes on....O M G!!  My favorite 80's song, hands down!  But, I digress. I'm actually in my craft room working on my St. Patricks day decor.  

First, I did 2 apothecary jars:

Nothing fancy, just some foam, glittered shamrocks, some moss covered balls and there you have it. I have 2 of these on my mantle.  (Please ignore the cable in the back, we got a new sectional which prompted the need to move our cable box, etc, and the hubby hasn't yet gotten around to re-routing/hiding the cords.)


Now, the fun part. I asked my hubby to cut me a large shamrock out of some really thin wood we had from a previous project. He did, and then he painted it green with some spray paint left over from Christmas. I cut him a template on my Silhouette Cameo, and he did his thing. 


Pretty damn good I think. 

Next, I wanted it covered in moss, so that's what I'm doing at midnight instead of sleeping. 


I bought this pack of moss from Michaels. While I love the look, this stuff is messy and it STINKS!  All the moss is on a thin plastic-type backing which is great because it keeps it together and makes it easier to work with than the loose moss. I turned the moss over and traced my shamrock on the back with a sharpie, and then cut my shamrock out of the moss. Easy peasy!  Then, I brushed tacky glue all over the green side of the wood shamrock and just laid the moss shamrock on top. Yep, folks, it's that simple. I pressed it down good all over, and I used my brush to dab some extra glue on a few spots where the moss was a little thin and just used some of the moss that fell off during the cutting process and stuck it on those semi-bare spots. Have to say I like the way it looks.


Dontcha just love the grocery store ad I used to protect my desk?!?  :-)

I made a burlap wreath awhile back, well I've made several. But, this one I wanted to be one that I could change embellishments for each season or holiday. So, using E6000 glue, I glued 2 clips to the back of the shamrock to attach to the burlap. Super simple, rustic St. Patrty's Day wreath. 


And, finally, I created this little print to put on the sofa table along with the jar of gold coin chocolates. 


Do you decorate for St. Patricks day?  I'd love to see your ideas!


Saturday, March 1, 2014

Diy dresser makeover


Our master bedroom is not large enough for the typical bedroom suite, with a bed, night stands, a short long dresser and a bureau. A couple of years ago my hubby and I bought some super cheap bureaus from WalMart, and while they fit the space, they served little purpose. For way too long now, we've lived out of laundry baskets because our drawers could hold no more clothing. So, after weeks of scouring Craigslist, thrift stores etc, I finally found 2 solid wood bureaus that were almost identical. These are perfect, although I do not have a "before" picture, I know-bad blogger!  

So anywho, my hubby brought these babies home and started sanding.  Then he used his paint sprayer to paint them black. 
In the pic below, you can see the sanded drawer fronts, and the bare frame.  I wanted the frame black and the drawers white, with some dark glaze. My first attempt at glazing furniture. I'm excited. 
After he sprayed the frames, he lined all the drawers up and painted them white. We used paint we already had on hand, just latex paint in a satin finish. After all the paint dried, I waxed, and waxed and waxed!  I used Minwax Paste Finishing wax.  

After waxing, I started the glazing process. This part was tedious, but the outcome is marvelous!  I used Behr Faux Glaze, mixed in some of the black paint we used on the frames.


  I gathered a large bowl of water and several washcloths (actually pieces of old dish towel I cut into small squares), and a paint brush. First, I brushed on the glaze, it looks dark at first, but you'll be wiping quite a bit of it off so don't worry.  Make sure you get plenty of the glaze into any nooks and crannies, and around any detailed part of your piece. 
After brushing the glaze on, I took a damp cloth and started wiping the entire surface of the drawer down, removing quite a bit of the glaze from the main surface, but leaving it pretty heavy in the crevices. You can see my workspace in the pic above, yes it's January and I'm in the garage, hence the space heater. I finished all 10 drawers in about 3 days, this of course was during the week when I had limited time to actually work on it. I wanted the hardware on each bureau to match, remember these were two ALMOST identical bureaus.  There are some slight differences and I wanted to downplay those by using matching hardware. So, after a trip to the Habitat Re-Store, I found enough of the same hardware to use on all the drawers. 
Brass just wasn't part of the plan, so these got a couple of coats of black paint, and turned out great!  

His:
Hers:

 And, below is a close up of the two of them, where you can see some of the differences, but in our room it's difficult to tell they're not a matched set. 
These turned out better than I, or my hubby expected!  I loved the antiqued look of the drawers. And, the best part is we're no longer living out of laundry baskets!  I foresee many furniture makeover projects in our future. 

Have you re-finished, or revised any furniture?  I'd love to see your projects! 


Pantry re-organized


Our panty has been a sore spot for me for a while now, I mean look at this mess!
I had made some attempts to organize it, but it just ended up a cluster-well you-know-what. The wire shelves just made organizing very difficult, the lip on the front cut out some height, so things had to be tilted to fit on the shelf if they were too tall, in a full pantry this is not ideal.  Plus, fining a way to use the neat stacking shelves or bins on these without them tilting or falling through the slats of the wire just wasn't working. Finally, I could take no more, so I talk the hubby int a trip to Home Depot for supplies.  We bought 2 8ft long pre-made white shelving boards and had them cut to size. We had on hand some small trim pieces to use as the braces for the shelves. 

Flirts, we took everything out, swept the floor and wiped down the walls, I wanted to paint the inside of the pantry, white just gets so dirty, and it's boring. I've been wanting to try my hand at stenciling and figured the inside of the pantry was the perfect pace, who'd see my mistakes, right?  
So, I painted all the walls in this tiny closet a light grey, left over from a bathroom project. Then, I used some Martha Stewart metallic craft paint and started stenciling. I lined the stencil up slightly below where each shelf would go. I loved how this turned out, even if you can hardly notice it when everything is put back in the pantry. But, it served its purpose, I got to practice stenciling!  
So, now everything has it's place, and I can find what I need when I need it. 
I had bought and labeled these canisters about a year ago.  After this project I added a few more canister and still need to re-label them. I'll share that with you in another post. 

This project took only a weekend, and the cost was approximately $50, which covered the cost of the shelves and a few organizational pieces like the white stacking shelf and the under-shelf basket for the bread. I love it!  The stacking can organizer I already had, but wasn't able to use to its full potential when trying to have it sit flush on the wire shelving.