Saturday, October 11, 2014

DIY Menu Board


My husband and I are terrible planners!!  Our idea of planning ahead for dinner is asking the other "What's for dinner?" at 4:00 each day. As you can imagine, this impacts our budget in a big way. Finally, I said no more!  So, each Sunday for the last 4 weeks, we've sat down and made a meal plan for the week. And, a grocery list to go with it. I'm pretty impressed with how well we've stuck to it. Of course, in about 3 weeks, 6' Wonder's high school basketball season will be starting and life will be crazy again. If we can stick to it during those 4 months, we will have earned a prize!  

Now that we've got the planning portion of it worked out, we need to get the communication portion worked out. What we've been doing is using the Notes app on my phone. I love this app, it's convenient and easy to use. I'll still use it, but I need a way to help us both remember what we planned, and let 6' Wonder know what the plan is as well. 

As usual, whatever I do has to be CHEAP!  In this case, I'm going for F R E E. 

What I used:
Large cork bulletin board
Black spray paint
Brown craft paper
Mod Podge
Wood clothespins
Scrapbook paper
Elmer's Glue
Thumb tacks
Plastic box the thumb tacks came in
Burlap ribbon
Satin ribbon
Hot glue gun/glue

I started with this cork board. I've had it for years, had actually spray painted it black about a year ago thinking I would use it if it were black, and not old worn out brown. Well, I finally got around to using it!  


But, I didn't want the whole thing black.  I considered Mod Podging some fabric to it. But, decided I would try a stencil first. Can you say FAIL? Back to the drawing board. Then, I remembered the roll of brown craft paper...yup, that's it. So, I painted the whole cork area with a good coat of Mod Podge. 


You can see my attempt at stenciling here, it doesn't look so bad in this pic, but that's because the worst of it is cut off. I had measured and cut a piece of the craft paper to fit inside the framed area. About this time, 6' Wonder came in and asked what I was doing. So, I recruited her to help. We laid the paper on the cork, and rubbed out as many of the air bubbles as we could. This paper is very thin, dollar store thin. So, it wrinkled on the Mod Podge. But, I actually like that. 


I let the bottom layer dry for a while, then brushed several coats of Mod Podge on top. I used the matte Mod Podge. 


 Left this to dry for a few hours and moved on to my computer. I typed out several entree items that we frequently eat, and the days of the week and printed them out on white cardstock. 


I also pulled out the clothespins and some decorative scrapbook paper. I cut little strips of the paper and used Elmer's Glue to glue the strips to the clothespins. 


Keep in mind, I haven't bought a single thing for this project at this point, so I'm well on track for keeping it F R E E. 

While the glue is drying, I start cutting out my cardstock prints. 


Once the Mod Podge had dried on the cork board, I felt like it needed some trimming. The paper still dried kinda wrinkly, but I'm ok with that. Gives it dimension and character. Yeah, that's my story, and I'm sticking to it. I plugged in the hot glue gun, and pulled out some burlap ribbon I had. I used the glue gun to glue the burlap ribbon around the edge, had exactly the right amount for this!


Then, I added some thin satin ribbon I had as well. I used some sparkly thumb tacks in the corners. 


A close up:


So far, I love it!  

Next, I used the glue gun to glue some plain thumb tacks to the backs of the clothespins. 


I needed something to hold my little entree cards in. I decided to try to cut the clear plastic box that my decorative thumb tacks had come in, and Mod Podge some scrapbook paper to it to decorate it. 


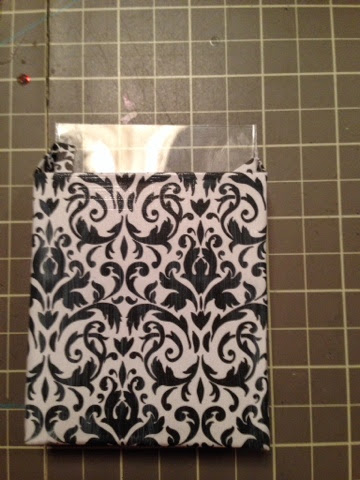
I just wrapped the paper around it kinda like a present, I just didn't cover the back since it will be pinned to the cork board. 

Then, I laid it all out on the cork board the way I wanted it to look, and started tacking things on. 


I printed out a shopping list too.  I find it's nice to have one posted somewhere so that everyone can write down items they want or need when they think of them. I clipped them on the board as well, and stuck a Sharpie in the box to use. 

I really, really like how it turned out. And, best of all it was F R E E!  I didn't have to buy anything to make it. SCORE!!  I keep working to get this family organized, and this is one step closer to my goal. Of course, by the time I reach my goal, 6' Wonder will be off playing basketball in college and it will just be me and the hubby so the need for organization won't be as great. But, oh well. I'm having fun doing it anyway. It took most of a Saturday in between doing other things around the house. Not too bad. 

So, how do you manage meal planning for your family? Any good recipes you wanna share?  


Saturday, August 30, 2014

DIY Concrete letter


I love, love the look of the rustic concrete letters, but the price?  Not so much. Being the DIYer that I am, I decided to make my own. I knew I'd need a form to pour the concrete into, but buying one of those was out of the question too!  This project had to be cheap, and by cheap, I mean FREE!  

I printed a large B from my computer, I used Franklin Gothic Demi font, it looked like a good, solid font with no curly cues or swirls, or little pieces that I thought might be hard for a first timer. I made mine about 8" tall and about 6" wide. I wanted it bigger, but then was reminded it will be made of concrete, so smaller may be better. 


I taped my printed letter onto a piece of cardboard (I used the bottom of a Mason jar box), and traced the B onto the cardboard by pressing firmly all the way around. 


Then, I removed the paper, and went back over the outline just to be sure I could see it well enough to cut it. You could trace your letter by any number of methods, this worked just fine. 


Next up, time to cut!  I started with my rotary cutter and shaved done the size of the cardboard I was working with just to make it easier. Cardboard is not easy to cut!  Then, I used scissors to cut the outer edges. For the little openings in the middle, I used my craft knife.  


Here it is, all cut out, ready to be the base of my concrete form. 


Once I had this base finished, I cut some narrow-1.5"-strips of the cardboard to use around the base to make a form. 


I used masking tape, you could use painters tape or whatever you have. The below pic is a little blurry, but shows you the bottom of the form once taped. I also used my hot glue gun to fill in cracks. I didn't want the concrete leaking through. 


My hubby mixed up some of this concrete we had left over from our deck re-do this summer according to the directions on the bag. 


I used this and it worked fine. My preference would've been to use a finer, less coarse, concrete mix. This has a lot of larger rocks in it as it's mean for things like post holes-which is why we bought it for the deck posts. So, if you're buying concrete I would suggest going with a finer mix. Once mixed, he scooped the concrete in to my form, filling it not quite to the top. If you try this, be sure to wiggle, tap, shake gently your form to get the concrete to settle evenly. Then, we set it outside to dry. 


After letting it sit for a little more than 24 hours, I just peeled the cardboard form off, very simple, the concrete hadn't stuck to it. You can see in the pic below, the form is still fairly intact after removing the concrete. 


The B had some rough edges on it, the cardboard was corrugated so it left some ripples on the outer edge. The good thing about this stuff is that it sands down very easily. So, I took a piece of coarse sandpaper and smoothed it down. 


This is after the first pass with the sandpaper. I love it!  I didn't want it too smooth or polished, I wanted a rustic look, after all, it is concrete. 


Close up view of the finished product. I'm so happy with how it turned out!


Have you ever worked with concrete/cement?  I'd love to see your work. 


Saturday, May 31, 2014

DIY Bug repellent

So, as I mentioned in my post for my DIY citronella candles, I use several different things to keep pesky critters away from me so I can enjoy my outdoor space sans bug bites. Along with my candles, I usually use some sort of bug repellant spray-Off, Skintastic, you know the kind. But again, the stuff is expensive. So, why not make my own-I can SO do that!


This is what I used:

Spray bottle-any you have on hand will do

Microwaveable cup/bowl

Funnel

Water

Witch hazel

Citronella essential oil

Lemongrass essential oil

Lavender essential oil

In a glass Pyrex measuring cup, I boiled not quite a cup of water in the microwave, then using a funnel, I poured it into my spray bottle until it was half full. Then, I added witch hazel til the bottle was just shy of full. Then, I added the essential oils-approximately 20 drops citronella, 10 drops lavender and 5 drops lemongrass. Give it a shake, and you're good to go. 


Works as good as the store bought, and smells great!  You can use other essential oils, just domsome research on he properties of the different oils out there, and add any scent you like as well. 

Don't let pesky critters keep you from enjoying some quiet outdoor time, between DIY citronella candles, and DIY bug spray, you're all set to spend an evening bite-free. 


Friday, May 30, 2014

DIY Citronella candles


Living in the South, one thing is a given during the warm weather-Mosquitos!  We recently re-built our deck (that post coming soon), and love spending nice evenings sitting outside, but having mosquito repellent is a must!  I use lots of several different options to repel these pesky critters, Citronella candles being one of my favorite.  They smell wonderful, they provide just the right soft light, and they add a homey, decorative touch to our outdoor space. BUT-they can be costly! And, we are on a t-i-g-h-t budget.  So, being the DIYer that I am, I said "I can do that". So, I did. 

What I used:

Soy wax flakes-I bought this 2lb bag at Hobby Lobby, $5 with my coupon. You can also find wax online at Amazon, Bulk Apothecary or any number of sites. 

Tin containers-I bought these at Dollar Tree, love, love, LOVE the color. You can use any container that is heat safe, Mason jars work great too. We have 3 big dogs who like to run and play, and inevitably they knock stuff over, so to be safe I prefer non-breakable containers. And, these were the perfect size and, did I mention I love the color?!?

Soy wax candle wicks w/ tabs-shop around, you can get these at craft stores or online, just make sure you get the right size wick for your container size-the package should have a chart, or the online site should have a chart. 

Essential oils-I used Citronella and lavender, both of which have mosquito repellant properties. You can also use lemongrass, tea tree and other oils for fragrance. Or, if you just want a scented candle, you can use any essential oil with or without pesky critter repelling properties. 

Wax melter-I got mine at Michaels, $10 with coupon, you can also use a double boiler or a metal bowl sitting on top of a small pot of boiling water. I like the wax melter because it has the handy pour spout. 

Wax color chips- I got mine at the Flaming Candle Company

Hot glue gun

Popsicle sticks and rubber bands


I start by putting wax flakes into the melter, I just guesstimated how much I neede-and came up short, but I'll explain that later. Turn the stove on low-mine was set on 3-4 to get the wax melted. You don't want it to get too hot, let it melt slowly, and stir frequently.  While the wax is melting, plug in your hot glue gun, and let it heat up. Keep stirring the wax!  Once your glue gun is ready, put a little on the bottom of your wick tab, and place the tab in the center of your container. Note: my containers are oval shaped, longer than wider.  I decided to use 2 wicks in these, just to be sure they would burn well. Press the wick tab down firmly to the bottom of your container-I used a Popsicle stock to do this. Now, let the glue dry, and go stir the wax some more.  


Once the wax is melted, turn the stove temp down, I turned mine all the way down to the lowest setting and add your wax color chips. I added 2 wax color chips, and stirred them into the wax as they melted, you use as many as you want for your desired color. Note-the color will lighten up as the wax cools. **Sidebar- when I first started trying my hand at making my own candles, I was brave and tried using crayons to color them. While they turned out very pretty, and I love the huge amount of color choices AND they are a super cheap option for coloring candles, I found that the candles did not burn very well. Now, I'm sure there is some chemistry involved here, probably some simple combination of ingredients that I could change. I'm thinking the melt point of the wax in the crayons is too different from the melt point of the soy wax, who knows, I'm no chemist. I'll keep playing around with the concept, but for now I broke down and bought some of the wax color chips**. Then turn the stove off but leave the melter on the eye. I put wax paper on the counter under my containers, you never know when you'll spill some, or some of the tin containers may not be completely sealed all the way around and may leak slightly. I do mean slightly, I found very thin rings of wax under my first ones, so l learned the hard way. It's an easy clean up, but y'all know the saying about an ounce of prevention. 

While the wax is cooling just a bit, you need to secure your wicks to make sure they stay straight when you pour the wax. There are all kinds of ways to do this, include fancy-smancy wick holders. But, I've found the 2 Popsicle sticks and 2 small rubber bands work just fine, plus I already had them on hand, lots of them. So, I'll explain the Popsicle stick/rubber band option. Place a small rubber band around 1 end of 2 Popsicle sticks stacked together. Then, using your finger, separate the 2 sticks and slide over the wick-don't worry about moving the wick, it's glued down, remember?  Move the sticks and wick until you have the wick centered straight, then gently put a second rubber band around the other end of the 2 sticks. If your container is too wide for Popsicle sticks, you can use chop sticks, skewers, silverware, you get the picture. 


This step will take only a few seconds, at least once you get used to it. When you're done, it's time to add the essential oils to the wax. I used 50 drops of Citronella oil, and 25 drops of lavender oil. Why so much, you ask?  It's just me. I like a strong scent. Most folks would say no more than 20 drops citronella and 10 drops lavender.  I march to the beat of my own drum, or as The 6' Wonder likes to say, "you're weird". Stir the scent in, then you're ready to pour your very own citronella candle. Note: keep track of the number of drops of each oil you use, it may come in handy a little later. 

Carefully, slowly, pour the melted wax into your container. Keep an eye on the wick watching for movement. Sometimes, the hot wax will melt the glue and it will come loose. Don't worry if it does, just center it again, stabilize it and let the small amount of wax you've poured already set for a little bit. If you have to do this, I recommend turning the stove back on low and set the melter back on it to keep it melted. If your wick stays in place, continue pouring until you fill the container almost to the top, I leave about a 1/4 inch space at the top of mine. Now, if you short pour, like me, just add some more wax to your melter, let it melt and repeat the stirring, coloring and scenting steps above, see I told ya to keep track of how many drops of the essential oils you used, I learned this the hard way too-notice the pattern? Once the wax melts, just pour it on top of what you've already poured. If I were using glass containers, this option could cause the candle to show lines and look imperfect.  To me, that's no problem, especially since I'm using tin containers. If you're using glass, and want perfection, you'll want to either a) do better than me at measuring the amount of wax you'll need or, b) reheat the original batch of wax with the additional wax so that it's all the same temp when you pour it. 


Now comes the hardest part-just sit back and wait!  These babies need to cool for at least 8 hours, or mine did, but these are fairly large candles. Just wait until the wax isn't soft, the container is cool, and it all looks solid. 


Once cooled, remove the Popsicle sticks, trim the wicks down to about a half inch, and then head out to your deck, patio, veranda, or balcony and enjoy a bug- free, or at least somewhat, evening. 


Night y'all!

ps remember how I said I use several different bug repelling options early in this post?  Well, check back in a few days and I'll show you how I made my own bug spray!